The Eenos WHMCS module currently supports only root operations on the Eenos hosting control panel.
### Supported Features| **Create** | **Suspend** | **Unsuspend** | **Terminate** |
| **Yes** | **Yes** | **Yes** | **Yes** |
| **Change Package** | **Change Password** | **Usage Updates** | **Client Area Link** |
| **Yes** | **Yes** | **Yes** | **Yes** |
It is important to click on the "Refresh Icon" on the server list so that the server packages will be fetched.
### Creating a Server Group The Eenos whmcs module needs a server group so that the module can automatically fetch the Eenos Packages from the server. To Setup an Eenos Server Group in WHMCS : 1. Go to **Configuration > System Settings > Servers** 2. Click **Create New Group** 3. Enter **Name** ( Eg: Eenos Servers ) 4. Click on the Server names from Selected Servers, 5. Click **Add** 6. Click **Save Changes** Now we created a server group with the added Eenos Servers. ### Creating Eenos Hosting Product You can create a product that provisions accounts on your Eenos server at **Configuration > System Settings > Products/Services** You can then create a product using an existing Eenos package or by defining custom options. You can also choose to create a reseller hosting product.If you choose Custom options along with a package name, then the package values will be overridden by the custom values.
#### Use an Existing Eenos Package To create a hosting product that uses an existing Eenos package, use the following product configuration: 1. For Product Type, select **Shared Hosting.** 2. Enter **Product Name** 3. For Module Select **Eenos** 4. Click **Continue** 5. Click **Module Settings** 6. Make sure the Module Name is Eenos 7. Select the **Eenos Server Group** 8. Click **Save Changes** 9. Again **Click Details** 10. Click **Module Settings** 11. Select **Eenos Package Name** 12. Click **Save Changes** Now you have a shared hosting product in whmcs with an Eenos package. #### Defining Custom Options To create a hosting product with a custom package, use the following product configuration: 1. For Product Type, select **Shared Hosting.** 2. Enter **Product Name** 3. For Module Select **Eenos** 4. Click **Continue** 5. Click **Module Settings** 6. Make sure the Module Name is Eenos 7. Select the **Eenos Server Group** 8. Click **Save Changes** 9. Again Click **Details** 10. Click **Module Settings** 11. Select **Eenos Package Name** 12. Enter the desired values of the package options 13. Click **Save Changes.**To assign unlimited values to a feature please use the keyword "**unlimited**". We don't consider zero as unlimited.
### [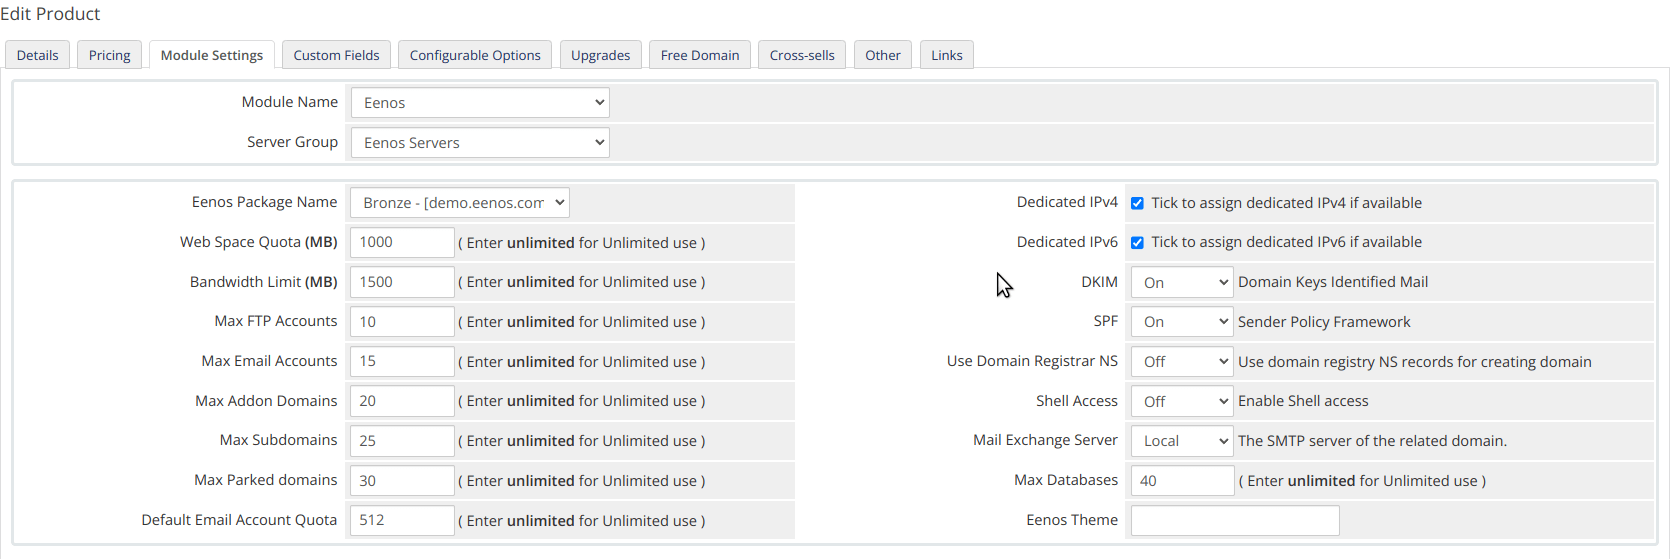](https://docs.eenos.com/uploads/images/gallery/2023-10/shared-hosting.png) ### Creating Eenos Reseller Package To create a hosting product for a reseller account, use the following product configuration: 1. For Product Type, select **Reseller Hosting.** 2. Enter **Product Name** 3. For Module **Select Eenos** 4. Click **Continue** 5. Click **Module Settings** 6. Make sure the Module Name is Eenos 7. Select the **Eenos Server Group** 8. Click **Save Changes** 9. Again **Click Details** 10. Click **Module Settings** 11. Select **Eenos Package Name** 12. Enter the desired values of the package options 13. Enter the Reseller Options 14. Click **Save Changes.** You may need to make sure the following reseller options configured: - **Reseller Ownership**, if you like to allow the reseller to own his accounts. It is dangerous. - **Limit Reseller by Number**, How many accounts a reseller can create. Default unlimited. - **Reseller Disk Quota**, The maximum allowed disk usage on all sub-accounts. Default unlimited. - **Reseller Bandwidth**, The maximum allowed bandwidth usage on all sub-accounts. Default unlimited.If you allow "**unlimited**" in reseller features it will allow the reseller to do overselling of the resources.
[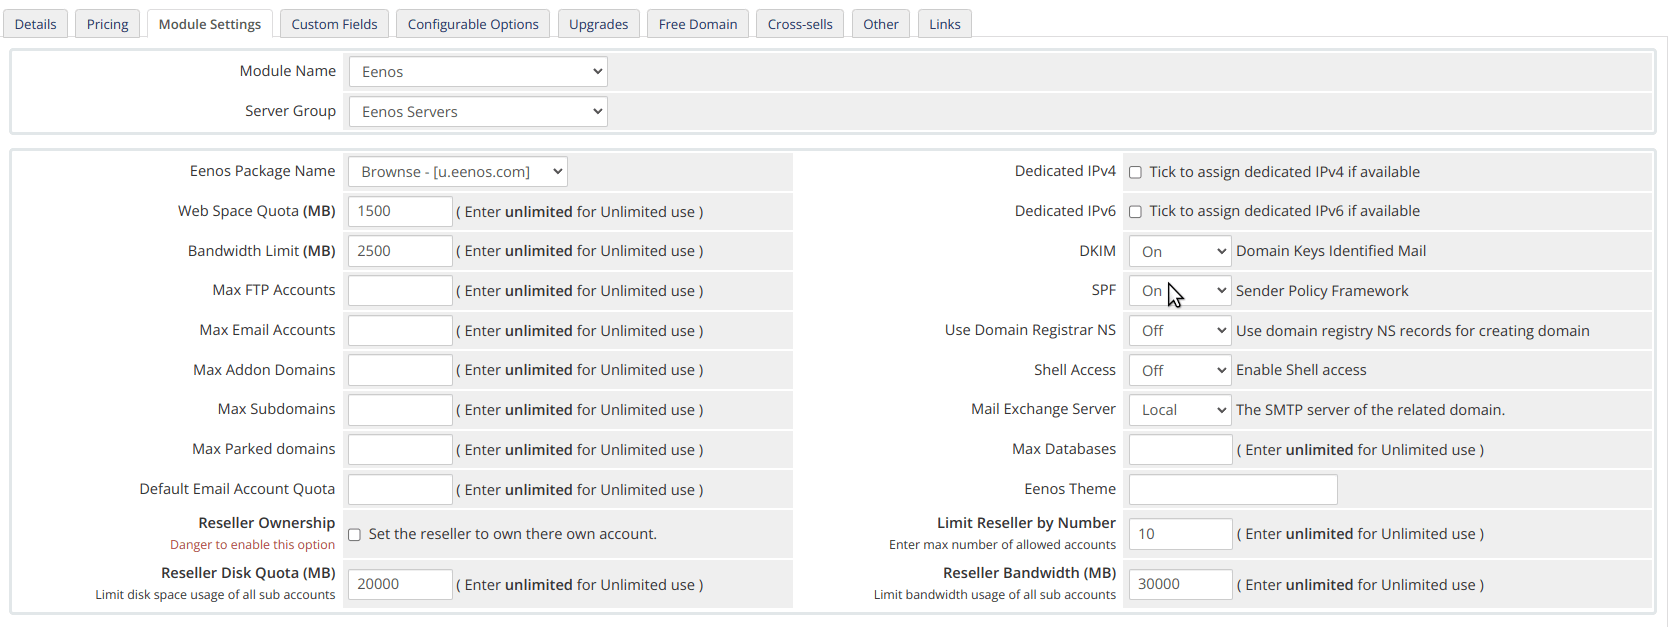](https://docs.eenos.com/uploads/images/gallery/2023-10/reseller-hosting.png) If your Eenos server is enabled with **Reseller Chain**, which will allow multi-level reseller accounts. That means a reseller can create other resellers. To Enable Multi-level Chained reselling Login to: **Eenos WAP -> Automation -> Tweak Settings -> Advanced Tweaks -> Multi-Level Reselling**