Configuration
Login to WHMCS
You may login to whmcs admin area as admin user to configure this module.
Eenos WHMCS module currently support only root operations on Eenos hosting control panel.
Supported Features
| Create | Suspend | Unsuspend | Terminate |
| Yes | Yes | Yes | Yes |
| Change Package | Change Password | Usage Updates | Client Area Link |
| Yes | Yes | Yes | Yes |
The following ports should be open for outbound connections from your WHMCS server: 5554 & 5555
In addition to the above basic features , this module support Sync Data , Server Sync and Account usage Sync services too.
Adding an Eenos Server
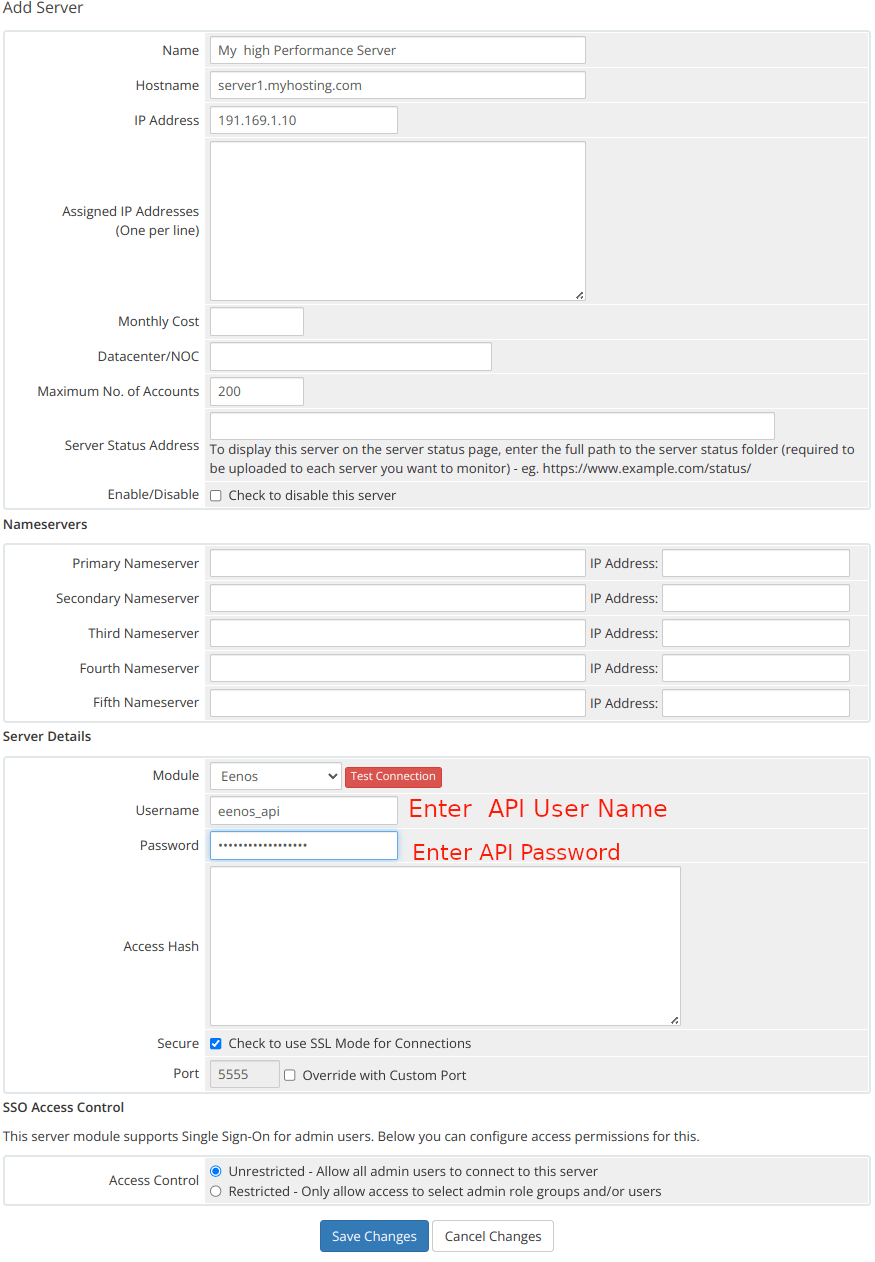
This WHMCS module need an Eenos server added inside your whmcs.
To set up an Eenos Server in WHMCS :
- Go to Configuration > System Settings > Servers .
- Click Add New Server .
- Select Eenos from the menu.
- Click Go to Advanced Mode
- Enter Hostname
- Enter IP Address
- Enter Username with API User Name ( You can create from Eenos WAP -> Preferences -> API Manager )
- Enter Password with Password of API user
- Click Test Connection
- Enter the desired additional server details.
- Examine the displayed default port. If your server uses a different port, check Override with Custom Port and enter the correct port.
- Click Save Changes.
Eenos WHMCS Module only use the API Login credentials , we don't use the root password or other method to access the API.
See a screen short below,
It is important to click on the "Refresh Icon" on server list so that the server packages will be fetched .
Creating a Sever Group
Eenos whmcs module need a server group , so that the module can automatically fetch the Eenos Packages from the server.
To Setup an Eenos Server Group in WHMCS :
- Go to Configuration > System Settings > Servers
- Click Create new Group
- Enter Name ( Eg: Eenos Servers )
- Click on the Server names from Selected Servers ,
- Click Add
- Click Save Changes
Now we created a server group with the added Eenos Servers.
Creating Eenos Hosting Product
You can create a product that provisions accounts on your Eenos server at Configuration > System Settings > Products/Services
You can then create a product using an existing Eenos package or by defining custom options. You can also choose to create a reseller hosting product.
If you chose Custom options along with a package name, then the package values will be overridden by the custom values.
Use an Existing Eenos Package
To create a hosting product that uses an existing Eenos package, use the following product configuration:
- For Product Type, select Shared Hosting.
- Enter Product Name
- For Module Select Eenos
- Click Continue
- Click Module Settings
- Make sure Module Name is Eenos
- Select the Eenos Server Group
- Click Save Changes
- Again Click Details
- Click Module Settings
- Select Eenos Package Name
- Click Save Changes
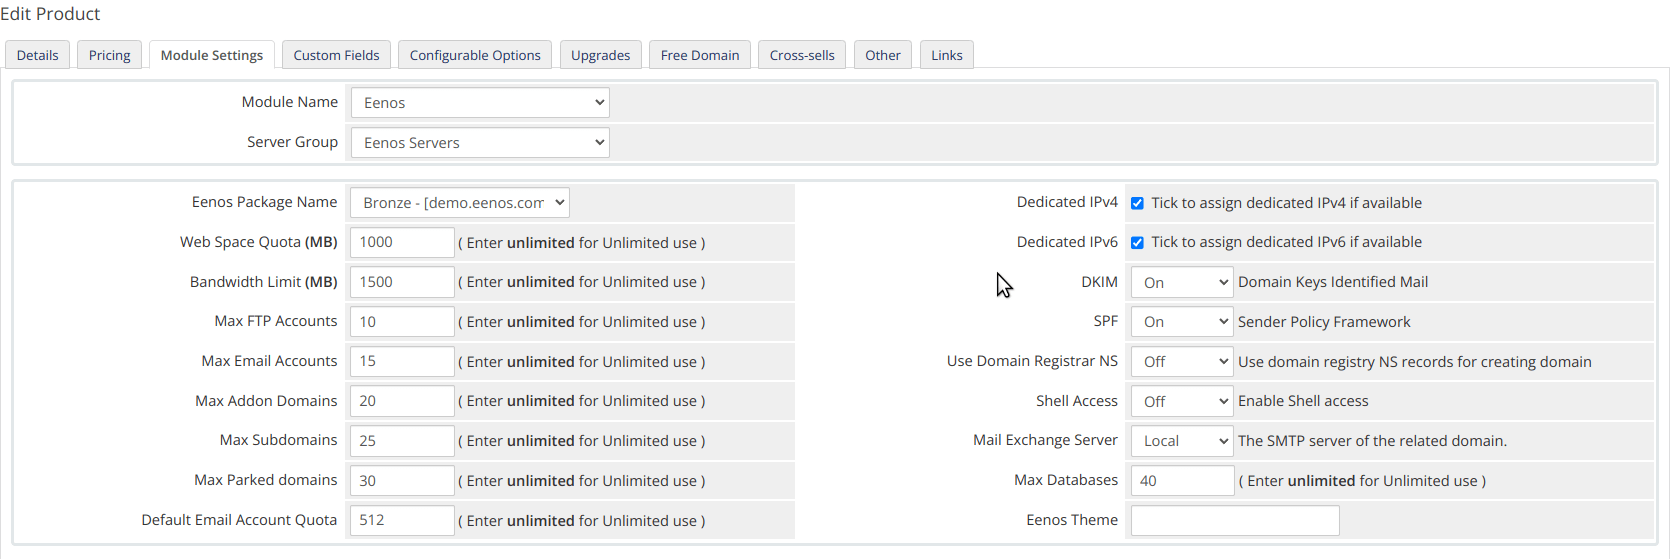
Defining Custom Options
To create a hosting product with a custom package, use the following product configuration:
- For Product Type, select Shared Hosting.
- Enter Product Name
- For Module Select Eenos
- Click Continue
- Click Module Settings
- Make sure Module Name is Eenos
- Select the Eenos Server Group
- Click Save Changes
- Again Click Details
- Click Module Settings
- Select Eenos Package Name
- Enter the desired values of the package options
- Click Save Changes.
To assign unlimited values of a feature please use the key word "unlimited" . We don't consider zero as unlimited.
Creating Eenos Reseller Package
To create a hosting product for a reseller account, use the following product configuration:
- For Product Type, select Reseller Hosting.
- Enter Product Name
- For Module Select Eenos
- Click Continue
- Click Module Settings
- Make sure Module Name is Eenos
- Select the Eenos Server Group
- Click Save Changes
- Again Click Details
- Click Module Settings
- Select Eenos Package Name
- Enter the desired values of the package options
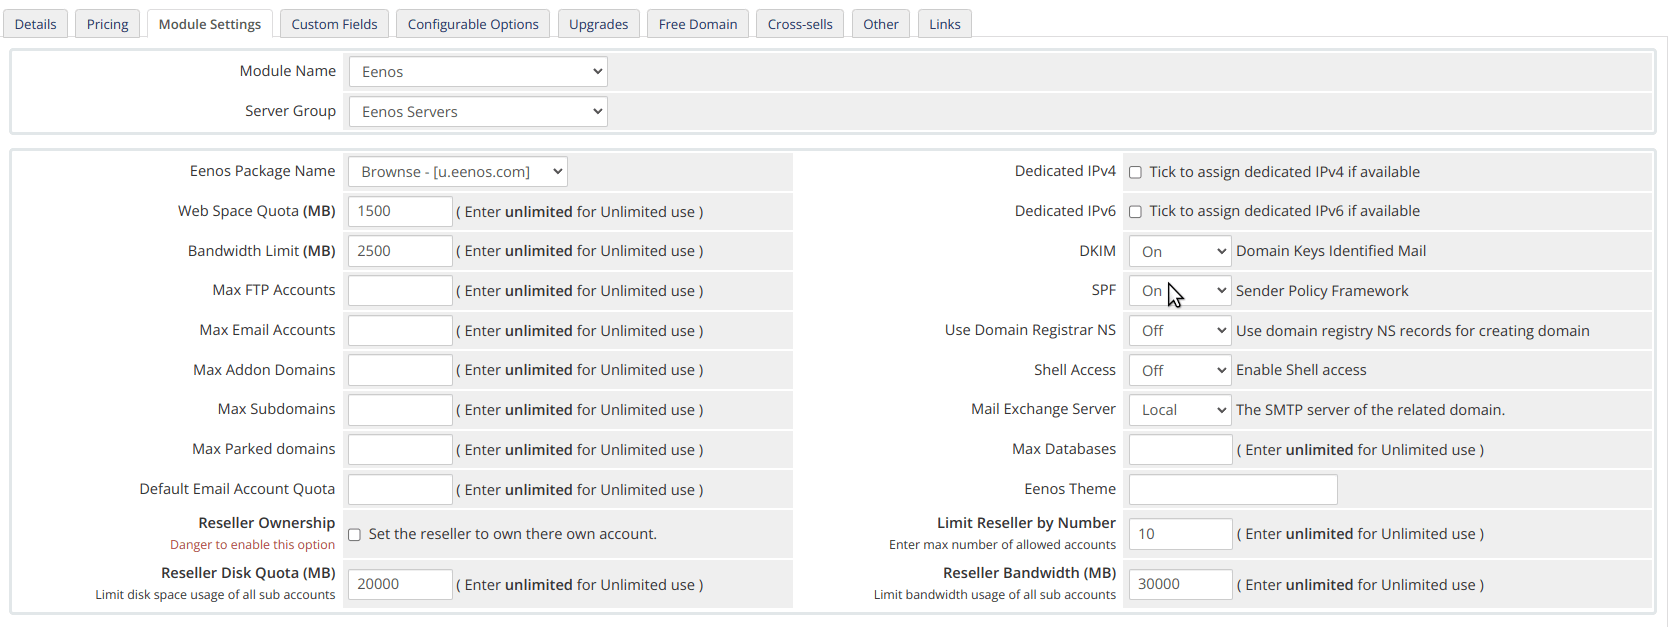
- Enter the Reseller Options
- Click Save Changes.
You may need to make sure the following reseller options configured:
- Reseller Ownership , if you like to allow the reseller to own his own accounts . It is dangerous.
- Limit Reseller by Number , How many accounts a reseller can create. Default unlimited.
- Reseller Disk Quota , The maximum allowed disk usage on all sub accounts. Default unlimited.
- Reseller Bandwidth, The maximum allowed bandwidth usage on all sub accounts. Default unlimited.
If you allowed "unlimited" in reseller features which will allow the reseller to do overselling of the resources.
If your Eenos server is enabled with Reseller Chain, which will allow multi level reseller accounts. That means a reseller can create another resellers.
To Enable Multi level Chained reselling Login to:
Eenos WAP -> Automation -> Tweak Settings -> Advanced Tweaks -> Multi Level Reselling


